Pages

Friday, April 26, 2013

Disney Princess Series: Merida


Hi Everyone! 

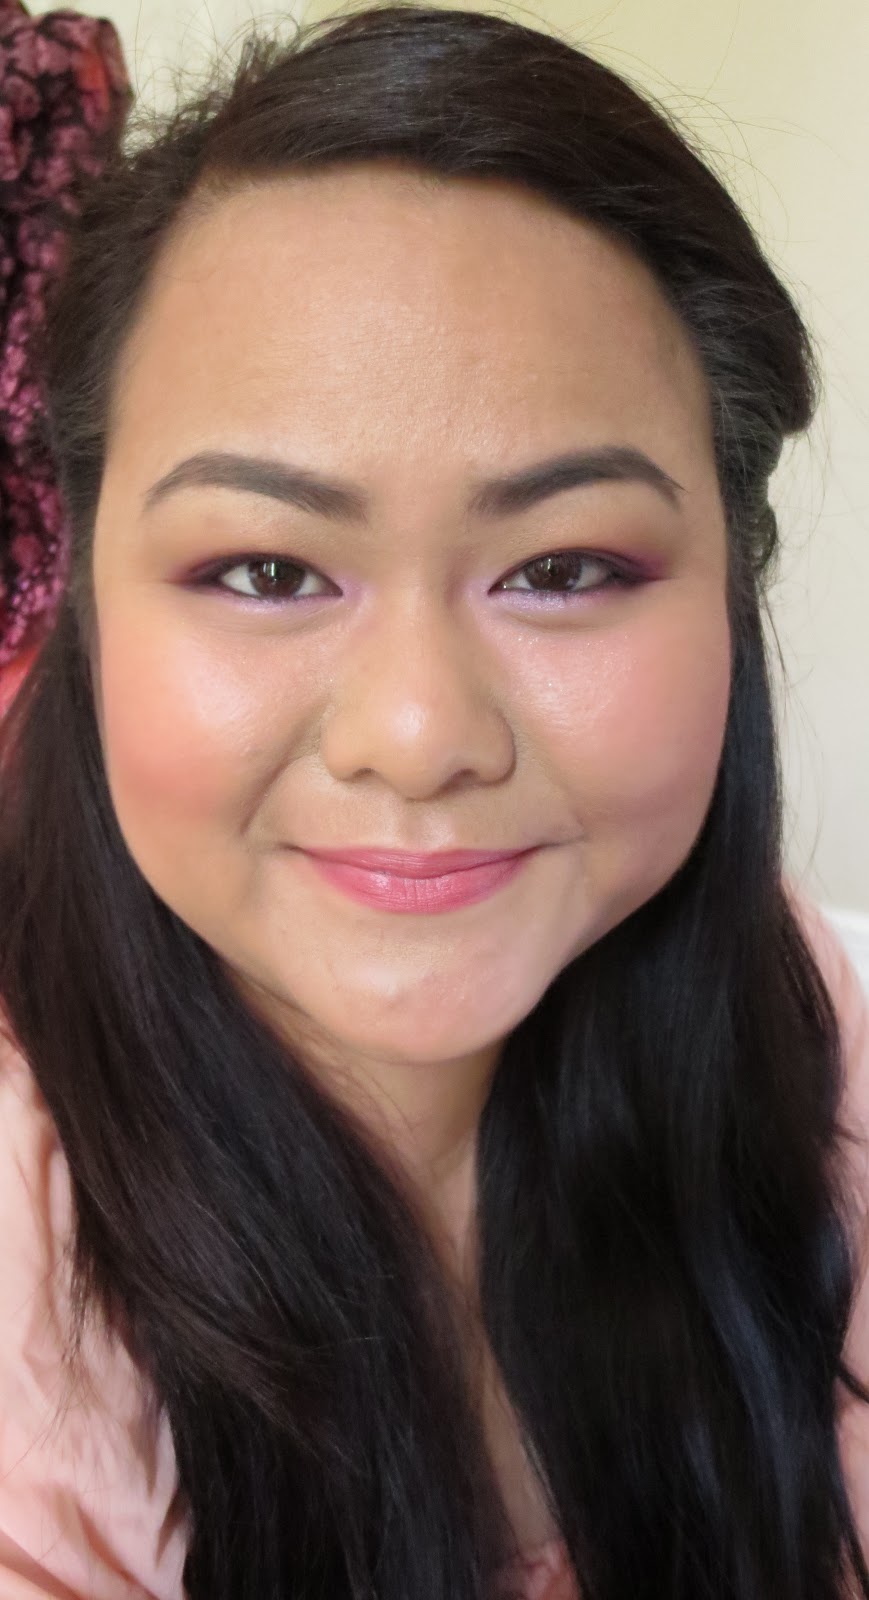
This look is another of my Disney Princess Series and it is inspired by Princess Merida from Brave. I love this movie because it reminded me of my relationship with my mom. However, I just loved the color of Merida's hair and the contrast it made with her fair skin. For this look, I took her Irish heritage and combined a look using different hughes of greens and gold. I finished the look with a peachy blush and pink lips.

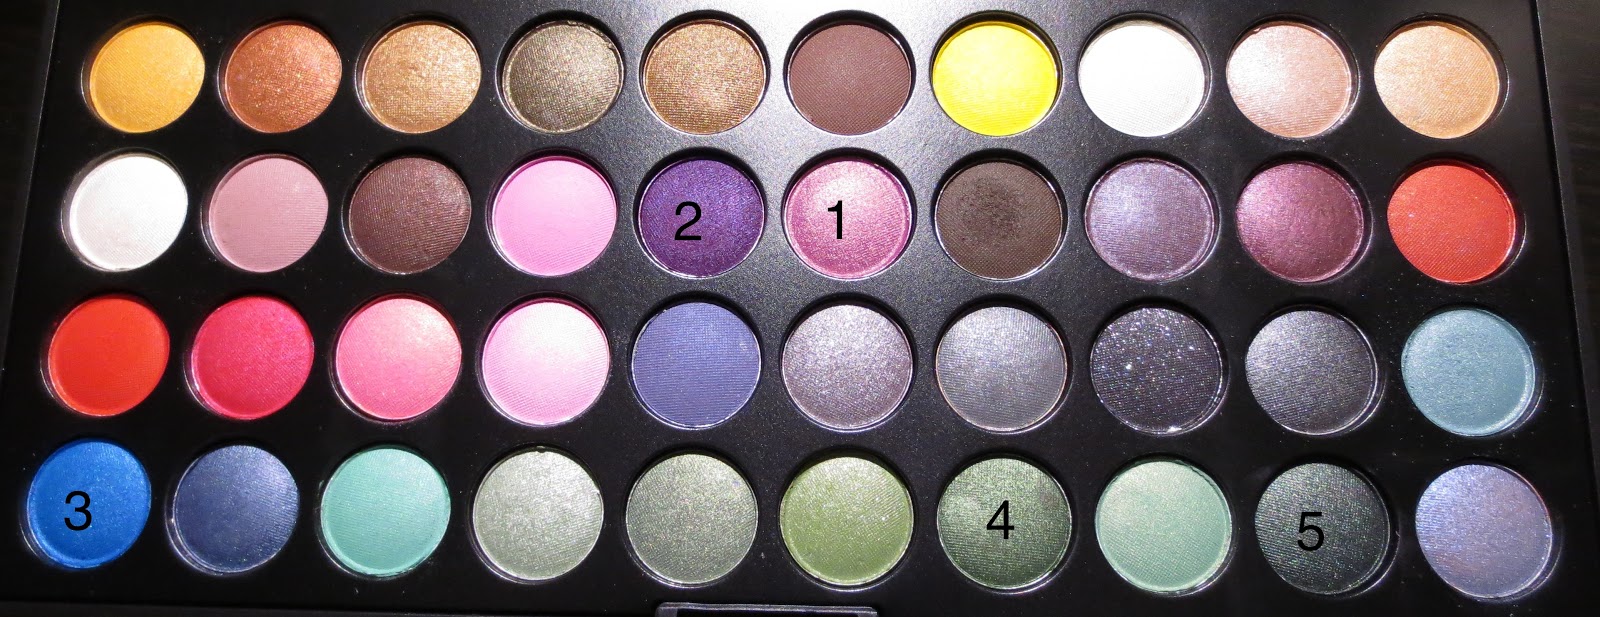
First, I took shadow #1 and highlighted my brow bone and inner corners. Then I took shadow #3 and applied it on my lower lash line. With shadow #2, I appled on on my outer corners and blended it out to create a slightly smokey eye. To finish the eye, I took shadow #4 and applied it like an eyeliner around the upper and lower waterlines.

*palette used: BH Cosmetics Party Girl Palette


Next Series of Princesses coming up soon!!!
-Snow White
-Aurora
-Cinderella
-Pocahontas

IPSY Review: April Bag Is The Best One So Far


Hi Everyone!

Okay, so this will be a review of the IPSY bag that I received for the month of April. I have been a subscriber since January 2012. I've only decided to write a review now because I am really impressed with this bag. I seldom get a bag where I enjoy all the products and this bag just hit the sweet spot for me, hahaha!

So April's bag came with a really simple white makeup bag with a hot pink trip and zipper on top. It came with 3 full size makeup goodies and well as a deluxe sample size for a hair care product for a total of 4 goodies!

For this month's bag, there were a total of 6 products. Each of the products has at least a different color to choose from. Depending on what IPSY chooses (I'm not sure how their system works), you get a "customized" bag that will supposedly complement  your style.


Product 1: TWO cosmetics duo eyeshadow in Heartache
When looking at the photos from the IPSY website, I was a little hesitant when I saw the color because it looked like a hot pink color. For me, I don't really wear hot pink because it makes me look really tired. However, when I got the product, I was amazed of how subtle the pink was. The color was a nice shimmer pink that would work great for highlighting the brows. The other color was a darker magenta color which you can use as an outer eyelid color or an all over shadow on your lids. The pigmentation was not as great as I hoped, but the colors alone made it a really nice color to have especially for spring and summer.


Product 2: Health Sexy Hair
This product is a hair treatment. It contains Argan Oil from Morocco which can help make your hair really soft and smooth as well as renewing your hair from heat damage and split ends. This product claims to add instant shine and protection, control frizz, boost moisture, increase elasticity, help smooth hair, and protect against environmental damage. You can apply this on damp hair and then blow dry to style or on dry hair to help tame fly aways. I really liked this product because I have seen a difference in shine and smoothness of my hair. Also, I've tried other products that are oil based and usually all of them would leave my hand feeling really oily. With this, I find it hard to get the product to stick on my hair dry or wet. However, this product is different because with just one swipe of my hand, there is no oiliness left on my hand. I can really tell that the product stuck to my hair letting me know that I'm not wasting half of the product on my hands. Another thing about this product that really caught my attention was that it claimed to quicken the time you blow dry your hair. Before I decided to cut my long hair, I tried this product on my hair for a couple of times to see if it works. I blow dry my hair after every shower and since I have long hair, I would take at least 20 minutes doing it. So, I had a timer take record the amount of time I took to blow dry my hair without the product and then with the product on my hair. Without the product, it took me 23:16 secs to finish blow drying completely. With the product, it took me 18:37 secs to finish drying completely. I would say it does have a significantly faster drying time, but only for about 5 mins. Either way, I was really impressed and now I use this product after every shower.

Product 3: Sation Nail Lacquer in Love At First Bite
This nail polish is really long lasting. The polish is a peachy nude color and really translucent. I applied a total of 3 coats to get enough color to show on my nail. It lasted me a good 4-5 days with no chipping which is amazing and I work in a lab setting and go to school in the day. For a polish to last that long is pretty impressive.


Product #4: Be A Bombshell blush in Sweet Cheeks
This product is my favorite of the 4 products. I LOVE this blush. It has great pigmentation and little goes a long way. It has shimmer in it which helps give you a shiny dewey look as well as giving you some highlights. The color looks really intimidating at first, but when you put it on it goes on very lightly and gives you a natural flush. I loved this color because it really suits my skin tone. I highly recommend anyone who is looking for a spring/summer blush to try this product out.

There you have it! I really enjoyed this month's bag and hope the next month's bag will be just as great. I'm planning to do a review of all the monthly bags I get from now on whether I like the product or not. This is to help those who are interested in subscribing to IPSY or wanting to see how well the product performs.

I'll see you on my next post!
xoxo Lyn


Monday, April 15, 2013

Disney Princess Series: Ariel

Hi Everyone!
I had so much fun creating this look because Ariel is my all time favorite disney princess. I wanted to make sure that I get every element that reminds me of Ariel from her seashells, her mermaid fins, and the ocean. As you can see, this look definitely pays homage to Ariel and her underwater adventures. I hope you have fun recreating this look as much as I did!

After applying the "base look" as shown in Belle's tutorial, I applied shadow #1 on the inner corners of my eyes. Then I took shadow #2 and applied it only on the middle section of my eyelids.  Taking shadow #3 I applied it to the top outer corners of my eyelids. With a blending brush, I blended the colors together. Next, with a pencil brush, I took shadow #4 and applied it on the lower lash line. Last, to add a little depth, apply shadow #5 to the crease and blend the look out with a blending brush.


*palette used: BH Cosmetics Party Girl Palette


Sunday, April 14, 2013

Disney Princess Series: Rapunzel & Mulan

Hi Everyone!
Continuing from the Disney Makeup Series, I have created a look inspired by Rapunzel. I also want to make note that depending on how you decide to wear the look, this look can also be inspired by Mulan.

First, we start with the "base look" which you can find from the Belle inspired look. After creating the "base look", take a shadow brush and apply Shadow #1 as a highlighter for the inner corners of your eyes.  Next take Shadow #2 and apply it all over the lids. Then take Shadow #3 with an angled shadow brush and apply it to the outer corners of the eyes. Take a blending brush and blend it out removing any harsh line. Lastly, take Shadow #4 and create depth in the outermost corners of the eyes.


For a rapunzel look, apply a nice coral pink shade lipstick and a light pink blush. This will make a nice daytime look.  If you want a more night time look, apply a darker shade of purple on the outer corners of your eyes to create a smoky effect. For the lips, use a nice deep red lipstick. With this look, I thought it was more suited for Mulan during her  "Honor" ceremony at the beginning of the movie. 


This is my favorite way to wear this look. It's very young and bubbly just like Rapunzel.
I used e.l.f.'s lipstick in Charming and Milan's Baked Blushes in Dolce Pink.
*palette used: BH Cosmetics Party Girl Palette

Sunday, April 7, 2013

Disney Princess Series: Jasmine


Hi Everyone!
This look is inspired by Jasmine. I love Indian Bridal makeup and creating this look was so much fun.

First, start with the "base look" that I posted on the Belle tutorial. With that, I used BH Cosmetic's Party Girl Palette and took shadow #1 and applied on the inner corners of my eyes and swept it down to the lower lash line as well. Then, I took shadow #2 and applied it all over my lids. I used a blending blush to blend the colors out evenly and remove harsh line. For definition, I took shadow #3 and applied that to the outer corners and the lower lash line to balance the look. Lastly, I took shadow #4 and applied a small amount on the outer corners to give the look a sultry effect.

Now, with an eyeliner pencil, I tight lined my water lines and drew a dramatic winged eyeliner.

Because Jasmine is very ethnic, I wanted to give her a tanned look, so I added Physician's Formula Bronze Booster to bronze my face.


*palette used: BH Cosmetics Party Girl Palette


Disney Princess Series: Belle

Hi Everyone!
This look was inspired by one of Disney's most beloved and beautiful princess. I hope you enjoy recreating this look as much as I did. This look made me feel absolutely beautiful and I know it will do the same for you :)

Because this is the first Princess look, I want to add the "base look" that I used for all these princesses. Before you start recreating these Disney looks, you should first apply this natural look. I found it much easier to blend the colors and add definition to the eyes.

Products used
NYX Matte Eyeshadows in:
Lap Dance - highlight the brow bones
Blame it on Midnight - apply for all over lid color
Dance the Tides - with a crease brush, contour the crease and blend!


For Belle's Look
With the BH Cosmetics Party Girl Palette, I applied the golden yellow shadow (1) on my lids up to my crease. Then I applied a darker drown eyeshadow (2)
and applied it on my outer corners to create definition and a little smokiness to the look. I finished it off with a glittery highlighter shade (3) and applied it on my brow bone.

For the cheeks, I LIGHTLY applied a deep rose blush on the apples of my cheeks

For the lips, I applied Sephora's Champs-Elysee which is a deep reddish brown


*palette used: BH Cosmetics Party Girl Palette


Disney Princesses Series

Hi Everyone!
I want to announce a new series that I will upload in the coming weeks. 

The Princesses:
- Belle
- Jasmine
- Rapunzel/Mulan
- Ariel
- Merida

Please stay tuned! :)

xoxox Lyn

Urban Decay: Let's Get Naked! Look #5

Look #5
- toasted
- hustle
- buck
- creep
- virgin


This look is continuing from Look #4. After finishing Look #4, you can wear it during work or throughout the daytime. Once it gets dark, just apply Creep to the outer corners to create a smokey effect. Apply your favorite mascara and dramatic eyeliner and you're set for an evening out. 


* don't forget to prime your lids for longer lasting shadows
* brushes used are from Sigma Mrs. Bunny Kit


Urban Decay: Let's Get Naked! Look #4

Look #4
- toasted: with E55, apply all over the lid
- hustle: with E70, create contour on outer corners
- buck: use E40 to blend at the crease
- virgin: apply as highlighter


Very wearable for the day.


* don't forget to prime your lids for longer lasting shadows
* brushes used are from Sigma Mrs. Bunny Kit

Urban Decay: Let's Get Naked! Look #3

Look #3
- gunmetal: with E55, apply this color all over the lid and slightly pass the crease. Use E40 to blend out the edges to create a smokey effect.
- creep: With E70, apply at outer corners creating a "v" and lightly bringing up the color to the crease
- sin: with a clean E55, apply highlight on brow bones and inner corners


This look is great for a night out of town. Draw an exaggerated winged eyeliner to create more drama.

* don't forget to prime your lids for longer lasting shadows
* brushes used are from Sigma Mrs. Bunny Kit


Urban Decay: Let's Get Naked! Look #2

Look #2
- virgin: with an E55 brush, apply highlighter on brow bone and inner corners
- sin: with same brush, apply all over the lid
- sidecar: with E70 brush, lightly apply at outer corners
- buck: with E40, lightly dab on the shadow and apply it on the crease


* don't forget to prime your lids for longer lasting shadows
* brushes used are from Sigma Mrs. Bunny Kit

Urban Decay: Let's Get Naked! Look #1

Look #1
- naked: highlight the brow bones and inner corners with E55 brush
- half baked: all over lid color with E55 brush
- dark horse: use E70 for outer corner contour and lower lash line for balance
- buck: use E40 as a transition to help blend the harsh edges


* don't forget to prime your lids for longer lasting shadows
* brushes used are from Sigma Mrs. Bunny Kit

Getting Naked!


Hi Everyone!
I'm so excited to be the owner of the "Must Have" makeup palette for any beauty enthusiast, Urban Decay's Naked Palette. If you haven't noticed already, I am a HUGE fan of the Urban Decay cosmetic line. In my opinion, they have great quality products that make you feel like you are getting your money's worth. Better yet, as a consumer, you know that you are investing your money on a company that not only provides great quality, but it's also vegan and animal cruelty free!

I know that not too long ago, Urban Decay came out with a second version called Naked 2 which is the reason why I have put off buying a palette. I really wanted to do my research and see which palette would be best for my personal taste. So, after "playing"with the two palettes at my local Sephora, I have decided that the original Naked palette would be best for my taste. First, I have warm undertones and the original Naked has shadows that would compliment warm toned skin. For the Naked 2 Palette, I noticed that the shadows were much cooler. The deal breaker for me, Naked had more matte shadows while Naked 2 had only one matte shadow. 

So far, I have been loving the shades. They are greatly pigmented and make everyday looks much easier to create because the colors in the palette are very wearable for daytime looks.

If you keep up to date with my blog, I will be posting an Urban Decay Naked series where I will create 5 different looks using all the shadows in the palette. I believe that when investing money in makeup, especially when it is expensive, I would want to use all the shadows to get my money's worth. So the looks I will be posting will help you get 5 looks to choose from while using the shadows in the palette.

See You Soon!
-Lyn

Wednesday, April 3, 2013

Review: Sigma's Mrs. Bunny Essential Kit

Hi everyone!
This post is on my review of Sigma's Mrs. Bunny Essential Kit. I bought the blue and pink version, but if you're going for the classic makeup brush look, this collection is also available in black and silver. Before I decided to do a review on these brushes, I wanted to wait at least a month and get the brushes into my makeup routine to get the full use of these brushes and their capabilities. Now that I have these brushes for about 3 months, I have fully experienced the use of these brushes to write a review.

In this kit:


E05 - Eye Liner
E30 - Pencil
E65 - Small Angle

These 2 brushes are great for eyeliner and adding shadow to your lower lash line. The E05 is tapered creating a very fine point, thus allowing you to create the thinnest lines with gel or liquid eye liners. With the E30, I like to use this brush to apply the eyeshadow on my lower lash line. It's perfect size allows you to put enough shadow to create that sexy sultry smokey eye. The E65 is a great multi-tool because it's perfect for applying any type of eyeliner as well as applying your eyebrows!

E40 - Tapered Blending: 

This brush is great for blending eyeshadows together. It's super soft yet sturdy enough to easily blend harsh lines and edges. 

E55 - Eye Shading: 
E60 - Large Shader: 

These two brushes are very basic brushes that every makeup enthusiast must have. It's great for applying shadows all over the lid. The E55 is great for applying shadows on certain parts of the eye lid while the E60 is great for applying a base shadow for an all over shade. I like the E60 brush because its big enough to apply highlighter on my brow bones. 

E70 - Medium Angled Shading: 

This brush is my definite FAVORITE of the entire brush set. It is great for applying shadow to your outer corners. I usually have trouble creating the perfect "V" on the outer corners of my eye. However, with this brush, I can create the perfect crease or smokey effect with just a single swipe! What I like to do is add a dark eyeshadow on the side where there are shorter bristles and create a gradient effect towards the longer bristles. I line the shorter bristles to the outer corners of my eye and sweep the shadow along my crease. Voila! perfect smokey eye! I have never applied my eyeshadows the same way again! This brush has definitely saved me time when applying makeup. I'm planning on getting myself a couple more in the future. 

F30 - Large Powder: 

I would have to say that I don't regularly use this brush because I don't use powder foundation too often. However, this brush is super soft to the touch and very easy to clean. If you don't use powder foundation, like me, you can still use this brush. Do you have the problem of applying too much blush? Well, use this brush as a "blending brush". Only instead of blending eyeshadow, you can blend the blush on your face to evenly apply it on your cheek. It will sweep away the concentrated blush and make your "over blushed" cheek look naturally flushed.... hey, that rhymed!

F40 - Large Angled Contour: 

This brush is straight forward, I use this brush to apply my blush and bronzer. It as the perfect size to fit the hallows of your cheeks and soft enough to create that natural flush. 

F50 - Duo Fibre: 

I have always wanted a Duo Fibre brush, mostly for the "airbrush" effect lots of makeup artists and beauty gurus swear by. However, this brush is a little disappointing. The problem is that the brushes are too soft and not sturdy enough to stipple on to your face. I found that the bristles would collapse once you touch the brush to your face making stippling a bit difficult. Also, the bristles create streaks on your face which I have to use my Real Techniques face brush to remove. I don't know if it is because of the Sigmax bristles that is diminishing the brush from fully allowing it to do it's job, but whatever it is, I could do fine without this brush. 

F60 - Foundation: 
F70 - Concealer: 

I do not use the F60 for applying foundation because I rather use a flat top kabuki brush or my Real Techniques complexion brush. However, I really enjoy using this brush as a concealer brush. I would apply my concealer to the larger blemishes and use the F60 to blend it in. For smaller blemishes, I use the F70


...and a very useful brush holder that is great for storing your brushes at your vanity or during a trip. It's sturdy enough to keep your brushes from getting damaged.


Overall, I really enjoyed this brush set and I recommend it to anyone who is starting out in makeup. It's really affordable compared to other brush kits. Also, along with affordability, it's really great quality. They have a special 10% coupon every month and also comes with a free sample of their eyeshadows.


April 2013 Coupon Code : AAM2013

For 10% OFF entire purchase!!!

& Get a FREE Travel-sized E05 Eyeliner Brush with 
purchases over $30