Pages

Thursday, March 28, 2013

Review: Covergirl Outlast Stay Fabulous 3 in 1 Foundation - Golden Tan

 Hi Everyone, this is a continuation of my search for the perfect drugstore foundation. The first two foundations I have tried went horrible, but I was not about to give up. I went to the drugstore and picked this foundation to try because it claims to have 3 benefits besides just cover up foundation. Also, what really caught my attention was that it claims to be SHINE FREE. As a girl with oily combination skin, I have an ongoing battle with trying to stay oil free throughout the day. Many foundations that are made for oily skin don't usually last as long and you may end up being oily after 6 hours. I wanted a foundation that can withstand my hectic schedule and love of being in an active lifestyle.


So, what were my thoughts? I have to be honest and say that I really like this foundation. It went on really smooth and it kept my face feeling smooth after hours of applying it. What I really like about this foundation is that it gives you an "airbrush" look to make your face seem super flawless! It also caught me off guard when it finished setting on my face because it had a powder finish allowing my oily skin to stay matte. There was a slight floral smell to the foundation that I find oddly soothing too. So far so good :D


I wanted to test this foundation's ability on staying on my face, so I went for a 3 hour skate at my city ice rink. Usually, I'd finish with a light sweat which will really try this foundation's "Stay Fabulous" ability. To my surprise, the foundation stayed on pretty well. It looked as though I'd just applied it. At this point, I'm very pleased with this foundation.

The Cons:
One problem that I had with this foundation is that it took me three bottles to find my matching color. Why? Because this foundation oxidizes! There are some ingredients in the foundation that create a chemical reaction with the molecules in the air. When this happens, the foundation will start to turn darker than what the color is in the bottle. There was nothing about this on the bottle so I had no clue.

With this, it is recommend to go at least a shade darker than your usual skin tone. But beware, I thought my color would be around the middle of the spectrum, but it was actually in the darker range. I followed recommendations of going a shade or two lighter, but I find the color too light even though it oxidized a shade darker. Therefore, I opted for a darker shade and have it oxidize to my color.

Other than that, I really love this foundation and I highly recommend it to those who have oily skin. Trust me, it will keep your skin looking matte for hours!


Wednesday, March 27, 2013

Review: Sonia Kashuk Full Volume False Eyelashes

Product: Sonia Kashuk Full Volume Eyelashes
Includes: 1 pair eyelashes and 1 tube of glue

This is a review on a pair of lashes by Sonia Kashuk. I was not intending on buying a set of lashes because I'm not the type to wear false lashes. However, as I was walking down the beauty isle, I noticed that these lashes looked very natural compared to other lashes in the market.

When I say natural, I mean that the lengths of the hairs are not too dramatically long and that the style, or in other words, how the lashes fall into place made it seem like natural lashes. So, because of how natural these lashes looked, I wanted to try them out and do a review.

First, I just want to say that I'm not really fond of false lashes. I have a few pairs prior to these lashes, but I usually find myself removing them before the night is over. This is because I find them very uncomfortable as they sat really stiff on my lashes. I took the time to flex all my pairs but they just didn't seem to feel right. Also, I don't really wear them because the hairs can be "unnaturally" long which I've noticed on Mac's eyelashes. For the reasons stated, I don't enjoy wearing false lashes.

However, with these lashes, it's the complete opposite! The lashes were very flexible and seemed to mold with my eyes once applied. Also, they were the perfect size. Many false eyelashes recommend measuring and cutting the ends so that the lashes will fit. I find them perfect for my eyes. The lashes looked very natural on the eyes while giving your lashes a helping hand. Although the hairs are not dramatically long, they provide enough lengthening and volume to your natural lashes.

Another key note about this brand of lashes that I want to praise is the formula of the glue. Many lashes that come with glue have very bad glue quality. Some glues can be chunky and apply unevenly in big chunks on different parts of the lashes. Some glues are too thick and take forever to dry. However, I really love the glue that came with these lashes because it came out really thin which made it easy to apply on the lashes evenly. Also, I noticed that once I applied it to my lash line, it began to dry immediately but slow enough to let me adjust them.

Overall, I truly enjoy these lashes and will be trying their other styles. I got this pair at my local target and it retailed for $4.99. I think compared to the other drugstore lashes, these are very good quality.


Monday, March 25, 2013

Curlformers! - A Review

Curlformers? What are these?

I stumbled upon these thing-a-ma-bobs at Sally's Beauty Supply. At first, I was confused of what these things were used for and thought they were molds for perming hair. I went home to research about them to find that these are types of hair curlers that require no heat to curl hair!

Personally, I take forever... close to 2 hours and a can of hairspray... to curl my hair with a curling iron. This is due to my mom's "No curling your hair until after you're married!" rule. Yes.... so sad that I haven't picked up a curling iron until after senior year of high school. Anyway, because of my "late blooming", I wasn't as skilled in curling my own hair like other girls out there. In fact, I'm still learning :'(

Enough of my rough, ugly duckling childhood. In reality, I don't have time to curl my hair even if I was a pro at using the curling iron. So, I went on a search to find an easier way to curl my hair. I tried EVERYTHING from foam curlers, heated curlers, velcro curlers, and even perming my hair (worst 3 years of middle school). I was desperate to find an easier, leave-on-hair-while-I-do-other-things form of curling my hair.

First of all, Curlformers changed my life (TV ad cliche, I know, but so true!). I got the curls I wanted without burning myself with the hot iron. Another plus, I didn't use any heat protecting serums or hairsprays to keep my curls from being damaged or wilting away. I only needed a light spray after styling which is great because my hair stays soft and shiny without the CRUNCH!

I bought my set at Sally's for about $40 which is a bit pricey! However, I returned that set because I found a better deal on Amazon for almost half the price, which I have added a link below. I have the 26 piece Extra Long set that comes with 26 Curlformers (Pink for curling inward and Orange for curling outward) and 1 light blue application stick to help put the lock of hair into the Curlformers.

(NOTE: These curlers come in various sizes! I have seen short curlers for shorter hair, extra wide for bigger curls, and extra thin for making really tight curls. You can choose which curler best suits you for the curls you are going for.)

This is a photo of my hair before applying the Curlformers. My hair is pretty long and end below by shoulder blades, so I ordered the Extra Long size which fit lengths even longer than my hair.

 This is after applying the Curlformers. It is really simple to do:
First, open one end of the Curlformer and slide the blue applicator stick inside until the claw is exposed on the other end. Next, dampen your hair with a squirt bottle. You can also do this after a shower to towel dried, but still damp hair. The best is towel dried hair after a shower at night. You can sleep with these curlers on and it won't be as bothersome. To apply the curlers, twist the hair at the roots tightly and attach the claw near the roots. Pull the claw with the hair in place through the Curlformer and your hair will mold to the spiral curls that the curlers make. Then, we play the waiting game until the hair is completely dried. At this time, you can do whatever you want. You can put on your makeup and your outfit for the day/night. You can run errands, clean the house, finish up some work, or lounge around the house until it's time to get ready. Note: The longer you keep the curlers on, the better and longer lasting the curls will be. You wont even need hairspray!

These are the curls after completely drying and removing the Curlformers. As you can see, they mimic the curls of a heated curling iron compared to the curls from hair rollers. Once all the Curformers are off, you will notice that you have exactly 26 curls on your head which you can leave, but will look a bit odd. My suggestion is to take each curl and divide it into three smaller sections. Doing so will give you more volume and body to your curls. After dividing your curls, you can style it to your hearts desire, add a touch of hairspray, and that's it!!!

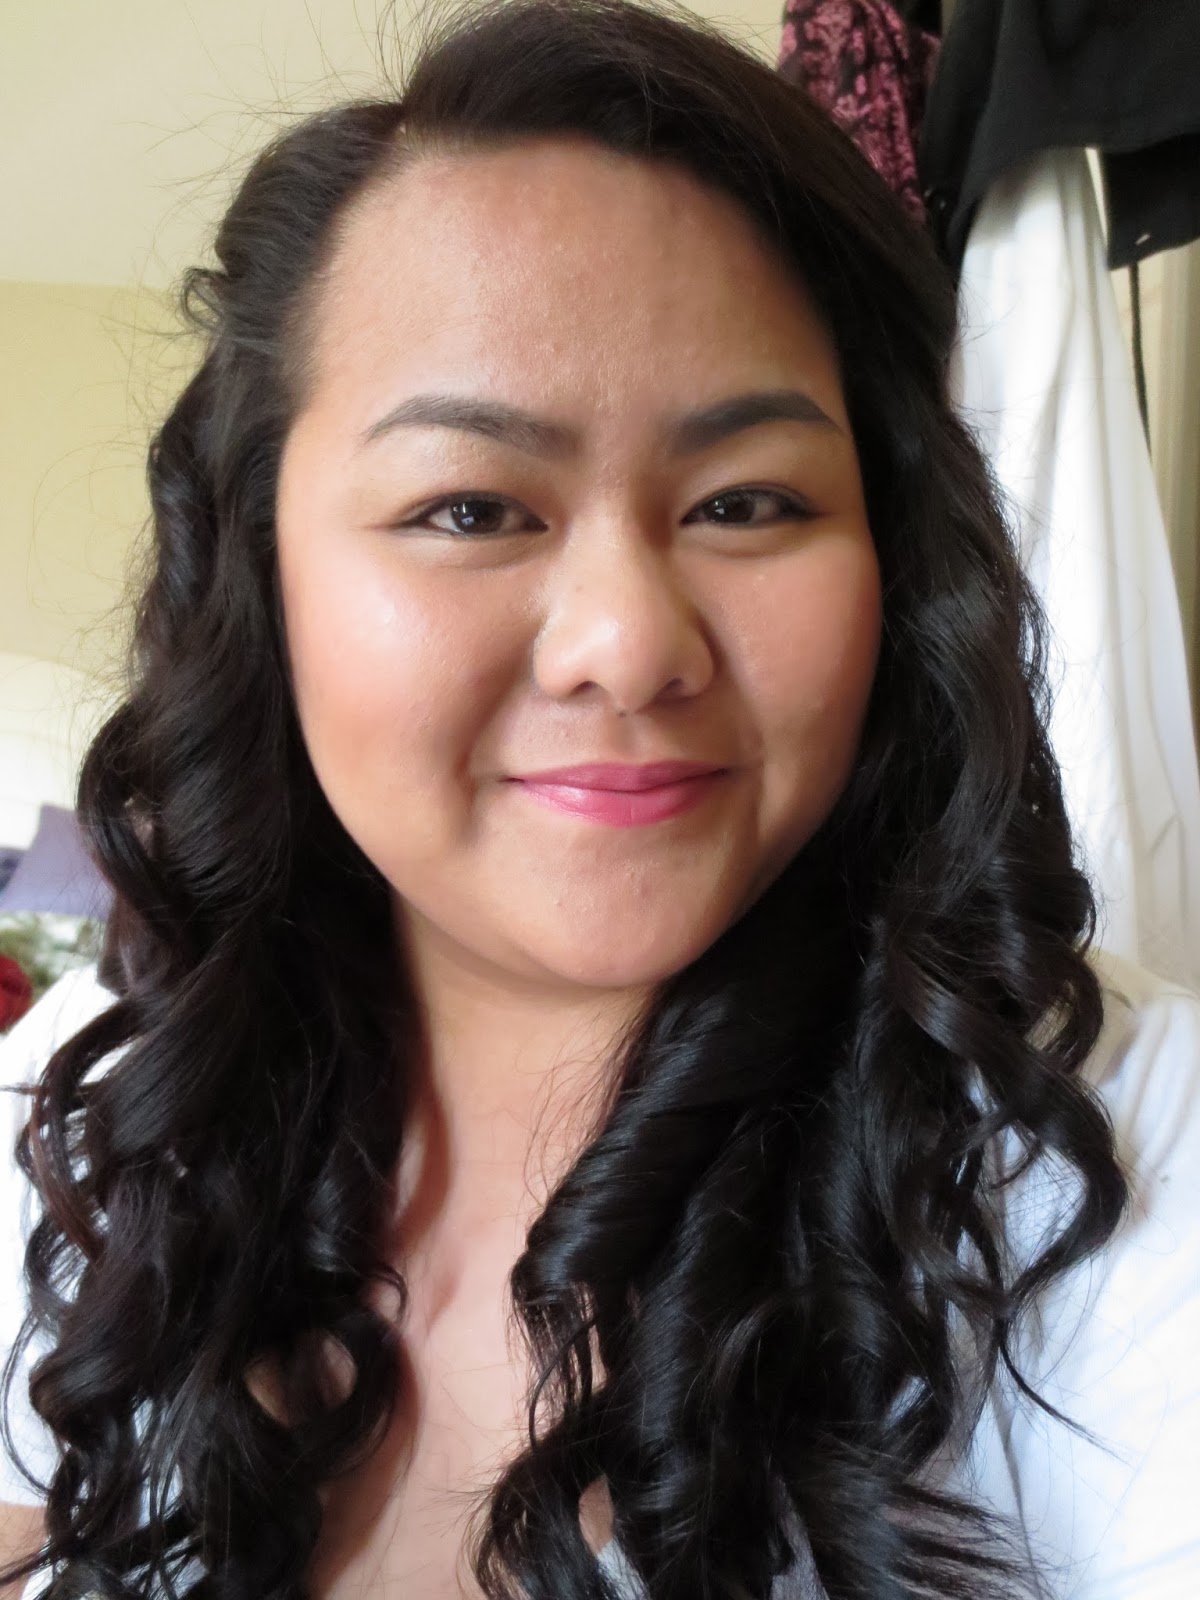
 This is after styling the curls and pinning some of the front curls to the side with a few bobby pins. I did not apply any hairspray because I liked the tightness of the curls already. These curls lasted me from 3pm in the afternoon to 1am in the morning for a total of 10 hours! AMAZING!!!!!!

I highly recommend these Curlformers for women who have no time to sit and curl hair for hours. It is great for wearing while getting ready or doing errand to make time more efficient and productive. I have not regretted purchasing this product because I can do so many things with the 2 hours I used to take curling my hair. Now, I can do my makeup, paint my nails, clean up afterwards, put on my outfit and accessorize, and have some extra time to feed my cat and clean up my room while curling my hair :)

I hope you all enjoyed reading and try this product out!
Good luck!


Review: Maybelline FIT me! Foundation and Powder

This review is for Maybelline New York's Fit Me Foundation and Pressed Powder. I'm a shade 235, but I would prefer to go a bit darker to a 310.

Overall, I think this foundation is great with coverage and that it does really well in making your face look naturally flawless.

However, I do not feel that it is the best for oily skin because:

1. It leaves a dewey finish which can leave an excess of oil after an hour of application leading to a lot of retouching and oil blotting.

2. Feels really heavy! This foundation is very thick which can lead to a very "caked" on look. So, if you do not like heavy make up, I do not recommend this product to you, I would recommend Urban Decay's Naked Skin Foundation.

3. NOT photo friendly. For me, one of the most important things about foundation choice is how well it  looks with flash photography. This foundation will give you a ghostly white finish on your face! If you do not mind the white glow, then this wouldn't bother you.

4. With the Pressed Powder, I feel as if it does nothing unless you really pack it on your face. I literally had to put so much of the pressed powder that it made my face look even more caked on. Then, I felt like it was useless after the foundation began to seep with oil.

To sum it up, I feel like this foundation would work better with dry to normal skin. This will not work with oily skin like mine. Personally, I'm having a hard time switching foundations from the Urban Decay Naked Skin (which is my all time favorite foundation). I am still in the search for the perfect drugstore foundation, and this is sadly not it.


Prom Look: Old Hollywood Beauty

To help all the young ladies with this year's prom, I have came up with a makeup look that would look great with any dress style and color. This prom look is inspired by the make up of the early hollywood movie stars that symbolizes glamour and sophistication. 

To create this look, I affordable drugstore makeup so that it will be wallet friendly for high school girls. I used L'Oreal Paris Studio Secret Professional Eyeshadow Quad in Canyon Stone, Maybelline New York's "The Falsies" Volum' Express Mascara, e.l.f Gel Liner in Black, and Revlon Lipstick in Blushing Nude or Maybelline Color Sensation Lipstick in Red Revival


1. First, I took a shadow brush and applied #2 on my brow bone and inner corners of my eyes
2. With the same shadow brush, I applied #1 all over my lids as a base.
3. Next, I took a pencil brush and applied #3 on the crease and blend it out with a blending brush.
4. With the same crease brush, I applied #4 on the outermost corners of my eyes (Be sure to apply it with a light hand, we are not trying to go for a smokey eye. Instead, we just want a bit of definition to give the eyes a natural defined look).
5. Blend out the colors with a blending brush to get rid of any harsh edges. 
6. With your black gel liner, apply a winged tip (Again, make it as natural as you can by keeping the lines thin, but enough to add a bit of drama).
7. Apply a generous coating of mascara.


A) B)

Since this look is very tamed and natural, you can play around with the lip color. For A) I wore a nude lip to have a more angelic and innocent look to focus more on the dress. For B) I wore a bold red lip to give the look a more "Sexy Hollywood Starlet" appeal. 


The red lip was my fave :)

I hope this look inspired many of you to channel your inner Hollywood Starlet. 
Stay tuned for more looks for Prom to come.
Good luck!!!

Get The Look: Amanda Seyfried 2013 Oscars


One of my favorite make up looks at this year's Oscars was worn by Amanda Seyfried. She had dramatic smokey purple on her lids paired with a soft pink lipstick.

I think she did a great job in using colors to show off her amazing jade green eyes. Also, she toned down her eye make up with a soft pink to make her look more angelic and innocent.


I have done a little research on the colors she wore on her eyes and found that the closest matching shades were from Dior's 5 Colour Eyeshadow in Stylish Move which retails for about $60 in the US. However, I have found an alternative for those who wish to use a more affordable palette. To recreate this look, I used Anastasia's Want You To Want Me palette which retails for $22. On a happier note, if you have a palette or eyeshadows that are similar to these colors feel free to use them!


1. First, with my Sigma E60 brush, I swept Platform Wedge (#1) on my brow and inner corners of my lids for highlight.
2. With the same brush, I applied Jellies (#2) all over my lids as a base.
3. With my Sigma  E55 brush, I took Ziggy (#3) and applied that on my outer corners and crease. Then, I took whatever's left on the brush and swept them on my lower lash line to balance out the eyes.
4. To blend out the colors, I used my Sigma E40.
5. Lastly, I took my Sigma E70 and applied Iron On (#3.5). I used the angled edge to create a V on my outer corners
6. Lastly, I blended out the colors to get rid of harsh edges with my Sigma E40. Apply your favorite mascara and you're done!!!


For the lips, Amanda had a soft peachy pink tint. I used e.l.f's Lipstick in Charming.


I hope you enjoy this tutorial, good luck!