Pages

Tuesday, February 19, 2013

Review: Sigma's Synthetic Kabuki Kit

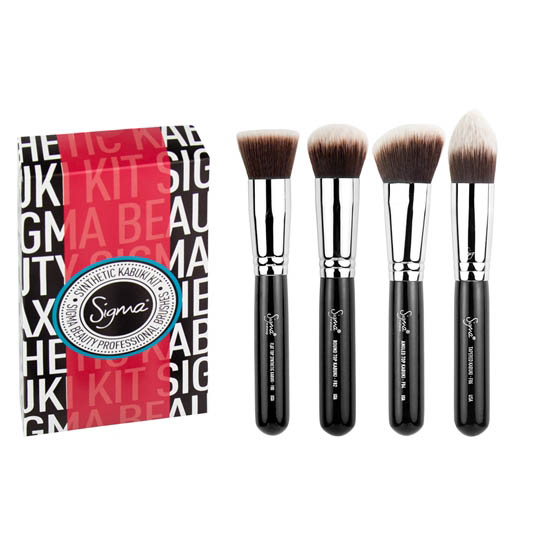
Hi everyone! Today I will be reviewing Sigma's Synthetic Kabuki Kit.

When it comes to makeup application, I believe that every girl needs a really good set of brushes made specifically for the face. Our face is our canvas and before we begin applying makeup, we need a good foundation. I've been looking for brushes that would apply a streak free liquid foundation application. Before learning of Sigma's Kabuki Kit, I've been relying on e.l.f.'s Flat Top Powder Brush to apply my foundation. I liked the dense bristles and to me, it helped buff and even out the foundation. The only problem about e.l.f.'s brush is that it did not last very long. After every wash, I felt that the bristles began to loose the shape as well as it's strength. I did not want to spend $3 every month just to replace one brush. So I did some research and found Sigma's Synthetic Kabuki Kit.

This collection of brushes are made with Sigma's Sigmax Fibers which are synthetic brushes that provide an "airbrush" application due to the densely packed bristles that mimic the softness and resilience of a kabuki brush. The Kabuki Kit is definitely my favorite collection because it has all the face brushes you need. Also, because these brushes are densely packed, it does a really good job in applying face makeup as well as giving an even coverage. The brushes are not too big or too small making it the perfect size to reach all the curves and contours of the face.

I got this 4 brush set at $62, but there is also another set that comes with 5 brushes for $76. It is definitely a big purchase, but it is very affordable compared to mac brushes. Also, because these brushes are of high quality, they will certainly last a long time. By how these brushes withstand washes and everyday use, it will definitely save me a lot of money. Below is my review on each individual brush.

In this kit, it comes with 5 different types of brushes:

- F80 Flat Kabuki: Of the four brushes, this is my favorite. I use this brush specifically for liquid foundation. It does a great job in applying an even layer of liquid foundation as well as buffing without the appearance of streaks.
Cleaning: Washing this brush is not fun! I don't know if it is because of the foundation I use, but I noticed this brush was difficult in getting the foundation out of the white tips. For recommendation, you should wash it once and let it sit bristle side down to allow the foundation to seep to the ends. After 15 mins, go back and rewash the brush. By the time you do the second washing, the foundation has seeped to the ends of the bristles and washing will be much easier.

- F82 Round Kabuki: I find this brush very similar to the flat top because I can use this for liquid foundation and it would work just as well. However, I like to give my brushes a specific job when it comes to my makeup routine so I wont have to use the same brushes for different makeup mediums. So for this brush, I like to use it for mineral or loose powders. It does a really good job applying powders onto your face. I like to think of this as a more precise kabuki brush without the fullness of a regular kabuki.
Cleaning: When cleaning this brush, I found it much easier that the F80, probably because I used loose powder. Overall, I did not have any problems getting the product or soap out.

- F84 Angled Kabuki: This brush is great for contouring, applying bronzer or blush. It nicely fits on the hollows of your cheeks making it so much easier to apply the contour or bronzer. I like to use powder blush and bronzer, but this brush will also do great with cream based bronzers and blushes as well.
Cleaning: This brush was the easiest to clean. I had no problem washing off the products. There was no hassle and it took the least amount of time to wash.

- F86 Tapered Kabuki: I use this brush for applying highlighter to my cheeks, nose bridge, chin, and forehead. Also, I like to use this brush for applying concealer under my eyes and on the edges of my nose. The fact that this brush is tapered really helps contour itself to the crevices of my nose and really gets down to the hard to reach edges that my fingers cannot reach. This brush has enough tension almost similar to my ring finger that it mimics it really well when applying under eye concealer.
Cleaning: Like the flat top kabuki, this is also very difficult to clean, not because of the product being hard to remove, but because of removing the soap! I thought this brush was easy to clean at first, but after wiping it on the towel to remove excess water, I notice that the brush began to lather. What...? I had to run the brush under clean water for another 10 mins to get all the soap out. Also, just by wringing out the excess water, I knew this brush would take the longest to dry.

You can get the brushes here:
Sigma's Synthetic Kabuki Kit
10% coupon code: BASE2013 available only until Feb 28, 2013


Monday, February 11, 2013

Valentine's Day Inspired Nails


 Hi Everyone, this is another nail creation great for Valentine's Day. It is super easy to do. All you need is a toothpick :)      
Products Used: 
    - Seche Vite Top and Bottom Coat
- China Glaze Nail Lacquer in Innocence, Seduce Me, and Sugar High
- Toothpick or Dotting Tool             


After applying the bottom coat, first apply Innocence. This polish is very translucent, so I recommend you use a more opaque light pink nail polish of your choice or apply 3 coats of Innocence as shown above.


With a toothpick or dotting tool (you can get these cheap on ebay or amazon, just search dotting tools. i've added a link below), first apply a generous dot for the first half of the heart. Then, with the toothpick, gently drag the bottom of the dot down to create the apex (oooh, medical terms! This just means the pointy part of the heart). 
Now, dip your toothpick again to your desired polish color and do the same for the other half of the heart. This will be hard at first, but you will get the hang of it after doing 3, trust me! Don't give up! Don't worry if the polish is uneven, you'll smooth it out with the top coat.

You can stop here, it still looks simple and pretty cute :) Make sure you space out your hearts. For me, I arranged them in a triangle formation.


Now, as I did on this picture, I added more hearts with another color. If you decide to add more, just add the colors the same way. Because you applied the first color in a triangle, you have enough space to add the second color of hearts. 

Don't forget to apply your Top Coat to smooth out the look.

I hope you enjoyed. I got so many compliments with my nails and I'm sure you will too!
Good Luck :)

Sexy, Sultry, Smoky Eyes for Valentine's

Products Used:

- Too Faced Shadow Insurance - Primer
- NYX Nude Matte Eyeshadow in Lap Dance
- Ulta Eye Crayon in Devil's Food
- BH Cosmetics Party Girl Palette
- Sigma Eyeshadow in Shine
- Urban Decay 24/7 Glide-On Eye Pencil in Zero
- Too Faced Lash Injection Mascara


First, I applied Too Faced Shadow Insurance to prime my eyelids. 
Use NYX Nude Matte Eyeshadow in Lap Dance to highlight the brow bone and inner eye corners.
For a base,  apply Ulta Eye Crayon in Devil's Food on the lids and smudge with a Sigma E55 brush.
With the same brush, I applied #1 of the BH Cosmetics Party Girl Palette on top of the base to even out the lids while concentrating the color more on the inner corners.
Use a Sigma E40 brush to blend out the edges.
Use Sigma E30 brush to apply the same color on the lower lash line.
To add dimension, I applied #2 on the center of my lids.
Then, with a Sigma E70 (my favorite <3), I applied Sigma's Eyeshadow in Shine in the outer corners and blended it out.
To finish up the look, I tight lined my eyes with Urban Decay's 24/7 Glide-On Eye Pencil in Zero and applied Too Faced Lash Injection Mascara.


 Foundation: Urban Decay's Naked Skin Foundation in 6.0
Bronzer: Physician's Formula Bronze Booster in Medium to Dark
Blush: Sephora's Colorful Blush in Healthy Rose
Lips: Be A Bombshell Cosmetics Lip Gloss in Hot Mess

Saturday, February 2, 2013

February Nails: Red and Gold Hearts

This look pays homage to Valentine's Day and also adding a lucky dash of gold hearts to help bring in the Chinese New Year :)

Products Used:
China Glaze in Phat Santa
Orly Nail Lacquer in Nagellack
Seche Vite Bottom and Top Coat


Painting on the hearts are simple. Michelle Phan did a tutorial with bandaids and I wanted to try it out. All I did was cut the adhesive flaps off the bandaid and made a heart cutout. After applying the China Glaze polish and letting it sit to dry, apply the bandaid on the nail and paint out your hearts. I recommend cutting out multiple bandaids because reusing them is very difficult to do.


Valentine's Date Night

Hi Everyone! This is a look made especially for Valentine's Day whether you have a special date with a special someone, hanging out with friends, or just watching a movie at home, this look will make you feel even more special no matter who you spend Valentine's Day with :)

With this look, I wanted to incorporate the theme of Valentine's Day by using a variety of shades of pink. To prevent the look from making your eyes look puffy, I defined the eyes by using a dark shade of brown to make the look more wearable.

What I used:

- Urban Decay Primer Potion
- NYX Nude Matte Eyeshadow in Lap Dance
- NYX Nude Matte Eyeshadow in Dance the Tides
- BH Cosmetics Party Girl Palette
- Physician's Formula Eye Booster Eyeline
- Too Faced Lash Injection Mascara
- Revlon Colorburst Lip Butter in Fig Jam


Highlight only your brow bone with NYX Nude Matte Eyeshadow in Lap Dance 
Using BH Cosmetic Party Girl Palette, apply #1 on inner corners of your eyes
Take #2 and apply it all over the lids
Take NYX Nude Matte Eyeshadow in Dance the Tides and apply it to crease
Blend thoroughly!
Take #3 and apply it to the outer corners, concentrating the color on the outside
Finally, take #4 and apply it to the outer most corners of the eyelid and blend upwards
Apply your eyeliner and mascara and you're done!